
Beekman 1802


This year I had the good fortune to work with the folks from Beekman 1802 on a set of illustrations for their limited edition “Twinkle Twinkle Little Farm” holiday packaging. The packaging afforded me the opportunity to illustrate 5 magical scenes capturing the heart and spirit of Beekman Farms - and each piece was printed on their gift sets offered through the Home Shopping Network.
Creating these pieces was a genuine treat for me, topped only by seeing them printed in person on foil paper around hand folded packaging. Seriously, the packaging quality of the Beekman Twinkle Twinkle collection is some of the best I’ve seen. Be sure to check out HSN’s page to grab these collectibles while they last!
And now, let’s dive into how these pieces were created…
Sketches
Once I received the brief from Beekman’s creative team, I jumped into Procreate using my iPad Pro & Apple Pencil to sketch out the basic composition for the pieces. At this point, we didn’t get into color as we were more interested in establishing the overall look and feel of the compositions for each piece.
I spent a lot of time pouring over the reference photos Beekman provided me to make sure I got the farm accurate for the 2 pieces which required accuracy. For the remaining 3 pieces, I was given license to create based purely on mood and feel - which I love doing (especially for Christmas themed pieces).


Flats
Once the sketches were completed, I jumped into creating the illustrations in black and white. Since these were going to be part of a collection, I wanted to make sure the color palette used for the series was uniform. My plan once I finished the black and white version of the pieces was to use Gradient Overlays on top of the pieces to uniformly apply color to the illustrations. I don’t always use this approach when creating a series of illustrations, but on some applications it works quite well (such as this one) and the results are a lot of fun.

Beekman 1802 · Farmhouse Flats

Beekman 1802 · Farm Flats

Beekman 1802 · Moonlit Hills Flats

Beekman 1802 · Holiday Star Flats

Beekman 1802 · Winter Village Flats
Color
As mentioned above, when it was time to color this series of illustrations I opted to use a gradient overlay to uniformly apply the chosen color palette to each of the illustrations.

For those who are interested in seeing what this gradient looks like, here’s a shot of the Gradient Editor in Photoshop. This a fun method of applying color, though it can be tricky if there are specific areas of the illustration you want to color a certain way. So long as your values are correct in the black and white illustration, the Gradient overlay can yield results such as the ones you see below:

Beekman 1802 · Farmhouse

Beekman 1802 · Farm

Beekman 1802 · Moonlit Hills

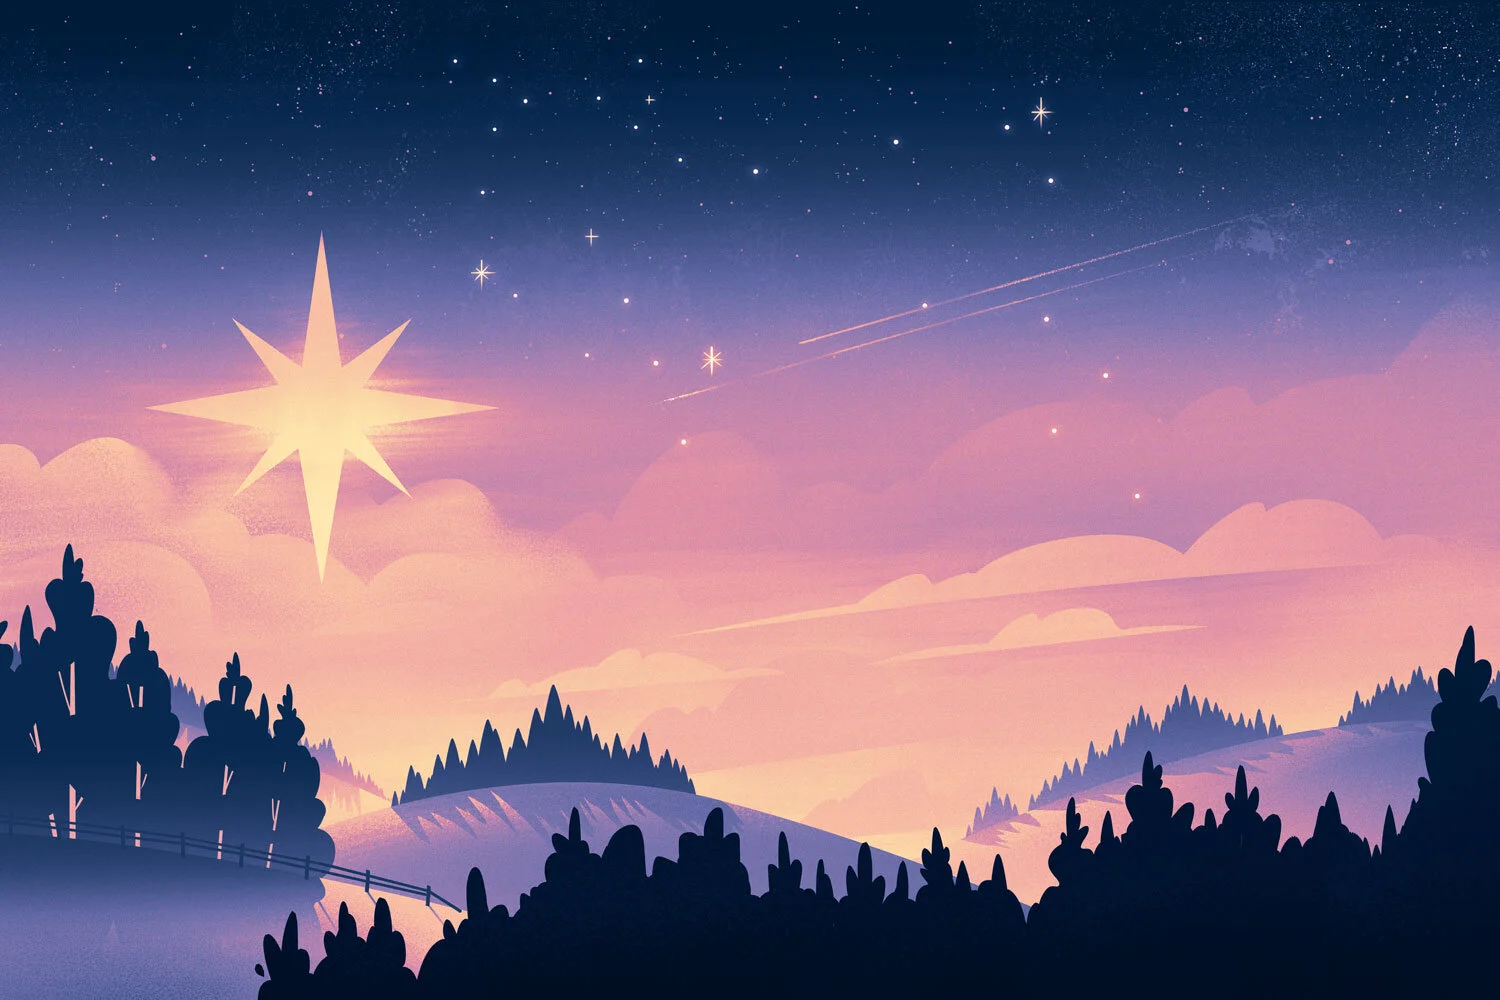
Beekman 1802 · Holiday Star

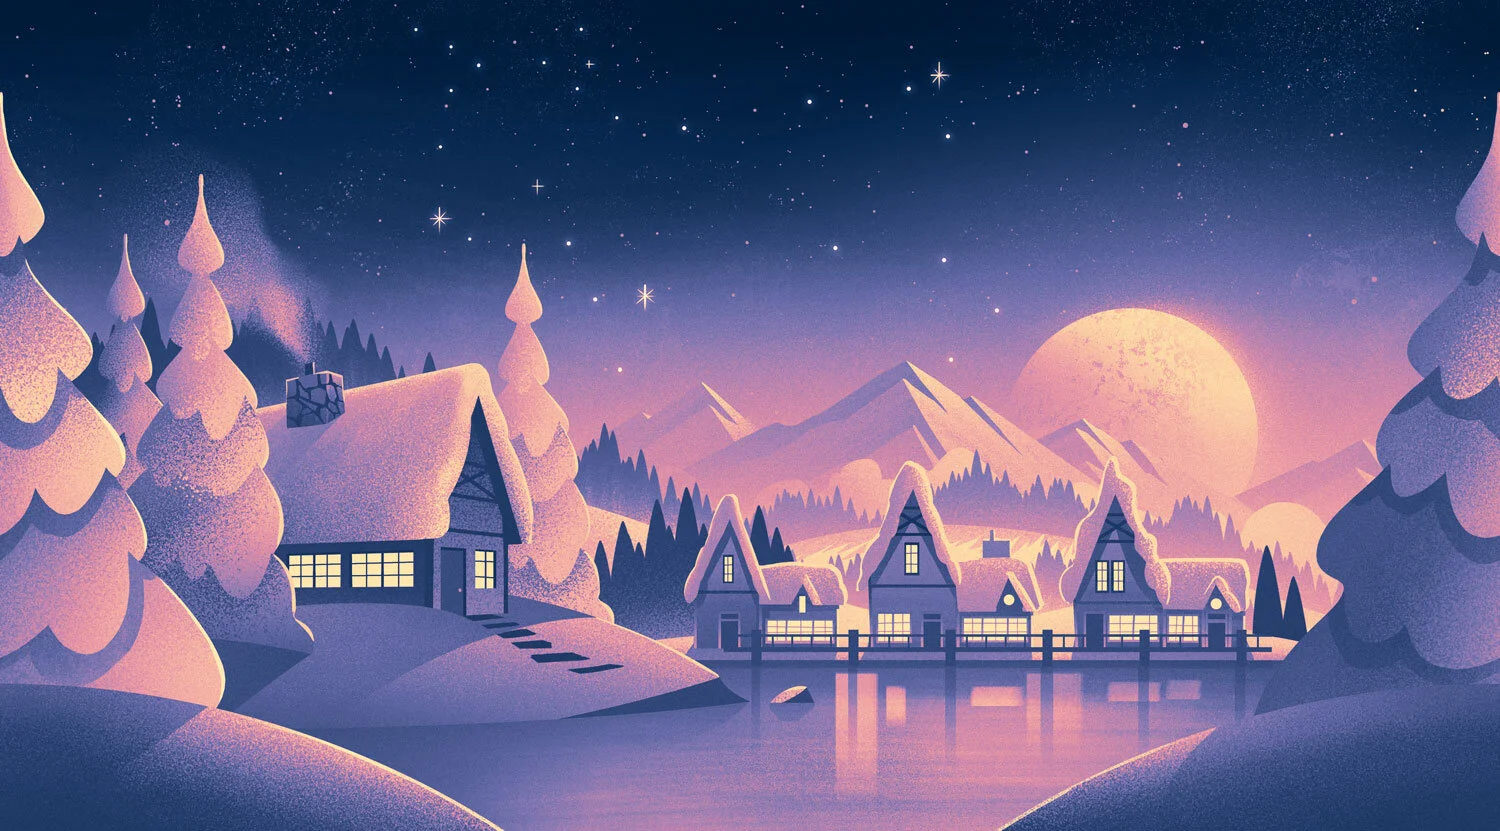
Beekman 1802 · Winter Village
As I mentioned, you should really see about getting your hands on the packaging these pieces were applied to. The foil packaging these were printed on really makes the illustrations sing.
Huge thanks to the folks at Beekman for giving me the opportunity to collaborate with them on this project. It was a lot of fun to work on and seeing the product first hand was exciting for me and my family.
Stay well, everyone!
Fontacular 2019

2019 FONTACULAR · Illustration
In 2019, I had the great fortune of working on the campaign for Fontacular - a font extravaganza featuring type bundles from 6 different type foundries. My task was to create a theme for the campaign including branding and a unique color palette, and then create a mountain of work to accompany the theme which included 18 type specimens, 3 web banners, 5 newsletter banners, 4 buttons, 4 stickers, 1 pendant, and a custom 8 color screen print which would be printed by the fine folks at Grand Palace.
Let’s dive into this mountain of work and I’ll give you a peak behind the curtain to see how I created everything.
Theme
The first step in the process was to create a theme for Fontacular 2019. Fontacular has a history of doing really fun themes with some truly exceptional artists. The theme we opted for with this campaign was Exploration & Discovery. The idea was to showcase brave explorers as they ventured out into the wild, land, sea, and space.
Logo Exploration
With the theme in place, I took to logo exploration. I wanted to create a logo for each of the 3 environments I’d be painting: Land, Sea, and Space. Knowing the illustrations themselves would be quite detailed and complex, I opted to design a very simple logo which would clearly serve as a marker for each of the environments whenever we chose to use them. I personally enjoy simplified logos, especially because of the freedom they offer when paired with type and illustration.

2019 FONTACULAR · Logo Explorations
18 Type Expressions
The big ticket item for this project was creating 18 unique type expressions which showed off just a taste of the fonts included with the 6 different bundles. Imagine having hundreds of fonts to sift through to try to pick a handful for each piece… it was a daunting task! It was also my goal to create a custom illustration for each of these 18 Expressions to show how type and illustration could be paired together. These are the results:


And in case you’re interested in seeing what the pieces look like without the type, I gotcha covered:


Thank You Images
Next up, it was time to create 3 images which would be used on the website to communicate with visitors. Once again I wanted to showcase Land, Sea, and Space - and I’ve included both the type and non-type versions:


Screen Print
One piece I was truly looking forward to working on was an 8 color custom screen print. As an artist, I’ve been working to get better at transitioning my painting method so it could be applied to screen prints and this piece was where I could put that knowledge and technique into practice. Of course, I can’t forget to say “Thank you!” to the folks at Grand Palace because they’ve been exceptionally patient with me as I’ve been learning my way around the screen print world.

2019 FONTACULAR · 8 Color Screen Print
Sugar Bowl Resort 75th Anniversary Poster
75th Anniversary Poster · Sugar Bowl Resort
“Beyond was all around me. My dream was a dream no longer. I suppose I was here because this was something I had to do. Not just dream about it, but do it. I suppose too I was here to test myself. Not that I had never done it before but this time it was to be a more thorough and lasting examination.”
This quote from Richard Proenneke (Alone in the Wilderness) perfectly encapsulates my experience working on the 75th anniversary commemorative poster for Sugar Bowl Resort. When I received the brief from Tyler at Saint Pierre, I knew this would be the project I could really test myself on. Every lesson I've learned studying the craft of illustration was poured into this piece and I enjoyed every moment of it.
Before I get into the process for this one, I wanted to take a moment to say thanks to Tyler at Saint Pierre as well as the fine folks at Sugar Bowl Resort for such a great opportunity and to my agent, Deborah Wolfe for helping me on one of the most memorable projects I've worked on so far. All of them were instrumental in bringing this piece to life and I am thankful for their contributions.
I realized shortly after receiving the brief that I've known about Sugar Bowl resort since I was a kid! There's a fascinating history behind Sugar Bowl and Walt Disney which resulted in many of their trails being named after Disney characters as well as an animated short starring Goofy learning to ski at Sugar Bowl. When I saw photos of the main Lodge, I realized the animated short took place at Sugar Bowl. It was a lot of fun knowing my past was connected to this amazing resort through one of my biggest artistic influences.
With a dream project at hand and motivation to contribute to an artistic legacy, I was chomping at the bit to get started!
Process
As per my usual process, I started with lots of sketches and explorations in my sketchbook using my trusty col-erase pencils. Once I'd worked out a handful of compositions, I jumped onto my cintiq in Photoshop and produced these sketches:

Sketch Option 1
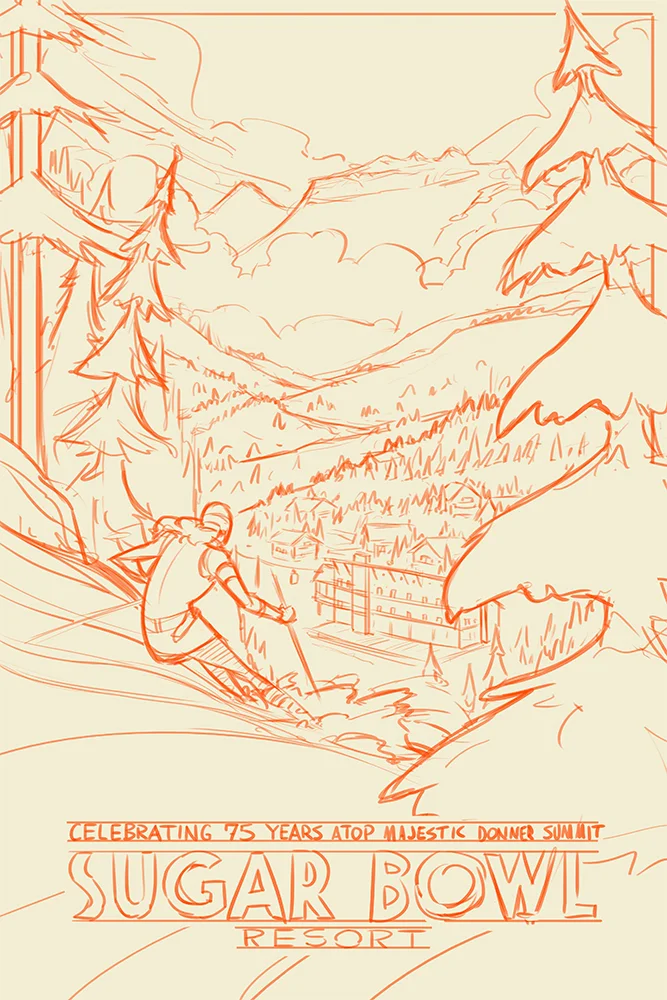
Sketch Option 2
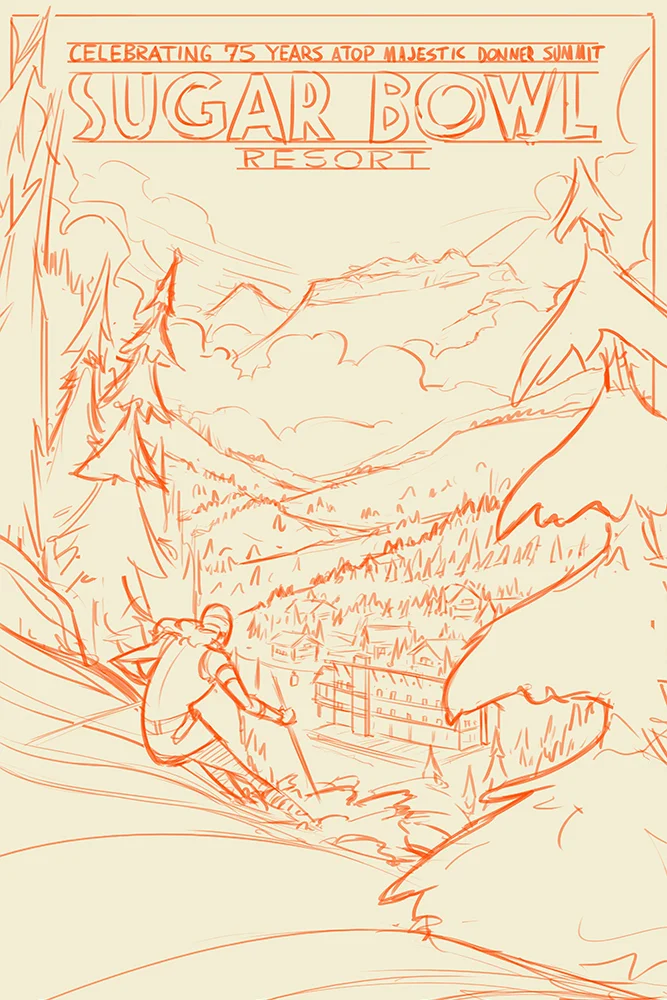
Sketch Option 3
The challenge with this piece was trying to show multiple aspects of Sugar Bowl which make it such a wonderful ski resort: great slopes, scenic views, and a snowbound village you actually take a gondola into (amazing!). I also had in mind early on the kind of lighting I wanted to use which would simultaneously capture bright slopes for skiing as well as lights within the snowbound village. That brings us to the next step...
Value Blocking & Brushwork
With the sketch approved, I moved into laying out the values and brushwork. To do this, I use custom pressure sensitive brushes in Photoshop as well as my cintiq. I work in Black and White to keep things simple, especially on a piece as complex as this one, so I can focus on getting the lighting and placement of whites, blacks, and values in between. If I can make a piece work in black and white, it increases the likelihood of working in color.
Black & White Flats & Brushwork
In Color
I really loved the way the black and white version of this piece came out. I could see, however, that coloring this piece was going to be a challenge simply because there were lots of layers and lots of complexity in the way I wanted certain aspects of the illustration to stand out. I ended up producing a handful of color options and gave the client the challenging task of picking an option (cause I never can!).
Color Options
While a number of my color options looked dramatic, a few of them skewed too far on the dark side, especially around the snowbound village. Tyler had the great suggestion of lightening up the town just enough so it would look more inviting without loosing the drama of seeing the town lights. The rest was history!
Here are a few detail shots which you'd be able to see in the print:


Thanks so much for taking the time to read my ramblings and view what I'm doing! I appreciate it and hope you enjoy it as much as I enjoy making these pieces.